Gooey Butter Cake
Ingredients for the first part of the recipe:
1 box yellow cake mix, without pudding
1 stick butter, melted
1 egg
Ingredients for the second part of the recipe:
1 (8oz.) package cream cheese softened
1 (16 oz.) box powdered sugar
2 eggs
Directions:
Preheat oven 350 degrees Fahrenheit. Mix together cake mix, butter and 1 egg until thick and smooth. Press into 9 X 13 inch butter pan. Beat together cream cheese, powdered sugar and 2 eggs until thoroughly mixed and pour on top of cake mixture. Bake at 350 degrees for 30-35 minutes. Sprinkle top with powdered sugar.
I got this recipe from off of the Kroger cream cheese package I bought for the cheese-ball I previously made. I haven't tried this one yet, but it sounds good. Thanks Kroger for sharing! Check out their website for more ideas: http://www.kroger.com. Interestingly enough though, this recipe isn't listed in their recipes online.
Happy Baking!
Love,
Tiffany
Tuesday, December 15, 2009
Monday, December 14, 2009
Recipe # 13 Lemon Lime Slush Drink
Lemon Lime Slush Drink
Ingredients:
4 cans frozen limeade
3 2 liters Sprite
1 can water
Sugar to taste
Ice
Mix well in a blender and serve. I would consider putting everything else in first then mixing it up and adding ice after that. It didn't say how much ice, but I would assume just add enough until it makes a kind of slush.
I got this recipe from the school I work at. One of the teachers left it by the drink they had made and it was delicious! If you are having a family party anytime soon, I would really consider using this as one of the drinks you serve. Thanks anonymous teacher! You rock!
Happy Cooking!
Love,
Tiffany
Sunday, December 13, 2009
Recipe # 12 Butterscotch Bubble Loaf
Butterscotch Bubble Loaf
Rhodes’ famous Butterscotch Bubble Loaf is our most requested recipe every year. Watch how easy it is to make this ”sticky buns” classic, and you too will be hooked on baking this bundt!Servings: 10-12
Skills: Beginning
Bake Time: min
Prep Time: 20 minutes min (not including thaw time)
Ingredients
24 Rhodes™ Dinner Rolls, thawed but still cold
1/2 box butterscotch or vanilla pudding mix, non-instant
1/2 cup pecans, chopped
1/2 cup brown sugar
1/2 cup butter or margarine
Instructions
Thaw rolls until soft (about 2 hours at room temperature). Spray bundt pan. Cut dinner rolls in half and dip in dry pudding mix. Arrange rolls in pan, alternately arranging and sprinkling pecans. Sprinkle remaining pudding mix over the top. Combine brown sugar and butter. Heat together until butter is melted and a syrup is formed (microwave about 1 1/2 minutes). Pour syrup over rolls. Cover with sprayed plastic wrap. Let rise until double in size or even with top of bundt pan. Carefully remove wrap. Bake at 350°F for 30-35 minutes. Cover with foil the last 15 minutes of baking. Immediately after baking, loosen from sides of the pan with a knife and invert onto a serving plate.

I was reading the newspaper the other day when I came across this recipe. It looked delicious so I just had to share it with everyone. I can't wait to try it! The video and picture above is also courtesy of the awesome people at Rhodes. I'll put some more pictures up when I make it. Thanks Rhodes Bake N Serv for sharing this recipe! I went to their website to check it out and you can too. Their website is www.RhodesBread.com and they have some of the best bread recipes around!
Happy Baking!
Love,
Tiffany
Saturday, December 12, 2009
Recipe # 11 Tiffany's Homemade Cheese-ball

Ok people, I made a recipe. Yes, it's true. I just made one up after looking at several different kinds of cheese-ball recipes and not finding quite what I wanted. So, I just made one up with what I had on hand. Ok, so I planned on making it once I saw that cream cheese was on sale for 88 cents a box at the local grocery store, but that's all I really bought. Everything else I already had. Can you believe that? Amazing isn't it? So, without further a due, I give you my very first ever cheese-ball recipe. I'm so proud!

Tiffany's Homemade Cheese-ball Recipe (Scroll down for an easier to read version...)
2 packages of cream cheese (You can cut this in half if you want because at first I just used one, but then I needed more for a work party so I used two to make it bigger and made two cheese-balls instead of one. You could also make one giant cheese-ball if you wanted to I guess. If you are making one, just use one package.)
1 cup of shredded cheddar cheese (Ours was mild, but you can use whatever cheese suits your fancy if you like sharp cheddar cheese go for it. Put as much as you think it needs really.)
1/2 cup of shredded mozzarella cheese (I would have put a whole cup in, but that's what we had at the house.)
1 cup of shredded Romano cheese (This was left over from some of our pasta meals that we've been having and I wanted to get rid of it.)
About 1 handful of green onions finely chopped (I didn't measure how much it was, but if I had to guess it was about 1 cup. Use as many as you want to taste. You don't want the whole thing filled with too many green onions, but you want it to have some for flavor because that's one of the things that brings out the flavors in it. If you are making one, just use about 1/2 cup.)
1 Tablespoon Parsley (At first I used 1/2 Tablespoon when I was making one cheese-ball instead of two.)
1 Tablespoon Seasoning Salt (At first I used 1/2 Tablespoon when I was making one cheese-ball instead of two.)
2 2oz (57g) packages of Dry Roasted & Salted Almonds *Optional* (Again, when I was making one I only used one package. We got these from someone at church.)

I have to tell you what I did the first time I started making this so you don't do the same thing. I put all of the ingredients, except the almonds into a bowel and proceeded to mix them with a hand mixer. Bad idea! It was like working with really really thick cookie dough. All of the cream cheese got stuck in the mixer. So, I after getting it all out of the mixer I used a fork to mix it in and it worked a lot better.
Ok. I'll write the ingredients more simple so you can read them without having to read all that other stuff. Just in case:

Tiffany's Homemade Cheese-ball
Ingredients:
2 packages cream cheese
1 cup shredded cheddar cheese
1/2 cup shredded mozzarella cheese (use 1 cup if you have it.)
1 cup shredded Romano cheese
About 1 handful of finely chopped green onions
1 Tablespoon Parsley
1 Tablespoon Seasoning Salt
2 2oz (57g) packages of Dry Roasted & Salted Almonds *Optional*
Directions:
Mix all of the ingredients together except the almonds.
Once the ingredients are mixed, scoop them into a bowl that you would like to serve the cheese-ball in.
Shape into a ball with a spoon.
Add almonds whole or chopped to the outside edge. (Optional, but I highly recommend you try it.)
Stick it into the refrigerator to let it sit and get firm.
Serve with crackers when ready.
Enjoy!

I hope you like this recipe as much as everyone who tried it did! Who knew I could come up with my own recipe at the top of my head? :)
Have fun with your appetizers!
Love,
Tiffany
Tuesday, December 8, 2009
Recipe # 10 Creamy Caramels
This is the second time that I have attempted this recipe. The first time the caramels went hard after about an hour. I think the heat was too hot, because it said "hard ball" on the candy thermometer instead of "soft ball".
I wanted to learn from my mistake and try, try again to get this recipe right. This time they turned out how they were supposed to, but after a few days they started kind of falling apart. Maybe they are meant to be eaten within the first few days anyway? I don't know. They are good while they last.
I think I might venture onto trying some other caramel recipes though. I'm not sure I completely like this one. I mean, the caramels do turn out soft and creamy, if you don't have the heat too hot, but after about two or three days they aren't as good.
This is the first time ever that I have made caramels, not to mention the only recipe I have used so far, but I don't think they are supposed to start falling apart like that after awhile. However, I'm no expert. Maybe they that's just what they do if you don't eat them while they're fresh.
I got this recipe from www.about.com. They have tons of caramel and other candy recipes. I only chose this one because it didn't have as many ingredients as some of the others. I'm a poor college student what can I say?
Here's the recipe:
Creamy Caramels
These smooth candies are what most people think of when they hear the word "caramel"; Rich with cream, they are great as-is, or even better when dipped in chocolate.
Ingredients:
- 1/2 cup cream
- 1/4 tsp vanilla extract
- 6 tbsp butter, cut into small pieces
- 1-1/3 cups light brown sugar
Preparation:
1. Prepare a small (6x6 inch) square pan by spraying it with nonstick cooking spray.
2. Combine the sugar, cream, butter, vanilla, and 1 TB water in a medium heavy-bottomed saucepan. Stir with a spoon over medium heat until the sugar dissolves and the butter is melted.
3. Bring to boil and cover for 3 minutes.
4. Uncover, but do not stir! Continue boiling until a candy thermometer reads 250 degrees.
5. Pour the caramel into the prepared pan and let it cool down.
6. When it is still slightly wet, score the top into squares, and then leave to harden completely.
7. Once firm, cut into pieces and wrap individually in waxed paper or cling wrap. Candies can be store in an airtight container at room temperature (not refrigerated) for up to one week.
I took some pictures and video as I made these caramels this time.
All of the ingredients in the pan. This picture is with the flash.

This picture is the same as the first, but without the flash. Sometimes it's better with the flash and other times it doesn't turn out. I'd like to take a photography class someday to find out more "secrets" to taking good pictures, even if you don't have the best camera. Then maybe I would know what kind of camera I really want. I'll have to put that on my future to do list when I get time for myself, if that will ever happen...

Same picture, but I'm stirring it this time.

It's starting to boil.

Here's the same picture without the flash. Which one looks better? After it reaches the right temperature around 240 - 250 degrees F (on my candy thermometer it says soft ball) It's time to dump the boiling caramel into a previously greased/sprayed pan.

Here's what it looks like when you dump it into the pan.

This is what it looked like without the flash. It was still bubbling a little.

It says to score it. So, that's what I did.

Here it is again without the flash.

Here's what it looked like when I was done scoring it.

Here it is again without the flash.

Once it is cooled down, cut out individual pieces and wrap them up. Another problem I found was that these were really buttery when I wrapped them up from taking them out of the greased pan. I don't know how to fix that other than trying to pat them off before you wrap them up.

I used wax paper, but you can also use plastic wrap. I did that the first time I made these.

Here's what it looks like when it's done.

Once you have finished wrapping all of them up, stick them in a decorative bowl and serve them to your friends and family.

Enjoy!
Ok. So, I'm going to try getting the video I took to work on this as well... We'll see how it goes and maybe I can do this again for some of my future recipes. Let me know what you like better pictures, video, or both. I might just end up doing both because I like that option the best, but let me know what you would prefer and maybe I'll just do one or the other.
Thank you www.about.com for your amazing candy recipes! Check them out for more recipes like this. :)
Happy snacking!
Love,
Tiffany
......................................................................................................
Hey guys! I got another Caramel Recipe for Christmas and I thought I'd share it with you. My mom got me this Betty Crocker Christmas Cookies book that has 74 recipes in it. One of them happens to be a caramel recipe.
Prep Time: 45 Min.
Start to finish: 2 Hours 45 Min
Makes 64 Candies depending on how big of pieces you cut them into I suppose...
Ingredients:
2 cups sugar
1/2 cup butter or margarine
2 cups whipping cream
3/4 cup light corn syrup
Cooking Directions:
1. Grease bottom and sides of 8-inch square (2-quart) glass baking dish with butter.
2. In 3-quart heavy saucepan, heat all ingredients to boiling over medium heat, stirring constantly. Boil uncovered about 35 minutes, stirring frequently, until candy thermometer reads 245 degrees Fahrenheit or until small amount of mixture dropped into cup of very cold water forms a firm ball that holds its shape until pressed. (On my thermometer, it says softball.)
3. Immediately spread caramel mixture in baking dish. Cool completely, about 2 hours.
4. Cut into 8 rows by 8 rows to make 1-inch squares. Wrap candies individually in waxed paper or plastic wrap. Store in tightly covered container.
High Altitude (3500-6500 ft.): Use 5-quart saucepan. Boil over medium heat about 15 minutes, stirring frequently, until candy thermometer reads 240 degrees Fahrenheit.
1 Candy: Calories 70; Total Fat 4g (Saturated Fat 2.5g); Sodium 15mg; Total Carbohydrate 10g (Dietary Fiber 0g); Protein 0g
Exchanges: 1/2 Other Carbohydrate, 1 Fat Carbohydrate Choices: 1/2 (Whatever that means!)
Anyway, if you try this recipe, let me know how it goes. :)
Love,
Tiffany
Thursday, November 26, 2009
Recipe # 9 Apple Fruit Roll-ups AKA Apple Leather
Today I realized that we had three apples we weren't eating. It's not that either of us don't like apples. We do. We just haven't been eating them for some reason. So, I decided that I should make something out of them that we would eat like apple pie or what I finally ended up deciding which was apple leather. I remember my great uncle, Chick, making these out of different kinds of fruits and I loved going over there when I was little and eating them. Anyway, I got this recipe from simplyrecipes.com Go check them out. They have some pretty cool stuff. Thanks! The fruit leather tastes amazing.
Here's the recipe:


"I eat a lot. I eat three times a day and I snack."~Suzanne Somers
Here's the recipe:
How to Make Fruit Leather
INGREDIENTS
- Fresh fruit (apricots, peaches, plums, berries, apples, pears, grapes)
- Water
- Lemon juice
- Sugar (if needed)
- Spices such as cinnamon and nutmeg (optional)
METHOD
1 Rinse the fruit. If you working with stone fruit, take out the pits, chop the fruit. If working with apples or pears, peel and core them, then chop. If working with grapes, de-stem them.
Taste the fruit before proceeding. Note how sweet the fruit is. If very sweet (ripe Concord grapes for example) you will not need to add any sugar. If still a little tart, you may need to add some sugar in the next step.
2 Place fruit in a large saucepan. Add a half cup of water for every 4 cups of chopped fruit. Bring to a simmer, cover and let cook on a low heat for 10-15 minutes, or until the fruit is cooked through. Uncover and stir. Use a potato masher to mash up the fruit in the pan. Taste the fruit and determine what and how much sugar, lemon juice, or spices to add. Add sugar in small amounts (1 Tbsp at a time if working with 4 cups of fruit), to desired level of sweetness. Add lemon juice one teaspoon at a time to help brighten the flavor of the fruit. Add a pinch or two of cinnamon, nutmeg, or other spices to augment the flavor.
Continue to simmer and stir until any added sugar is completely dissolved and the fruit purée has thickened, another 5 or 10 minutes (or more).
Note if you are working with grapes - strain the juice out of the mashed grapes to make grape juice. Force what is left behind, after straining, through a food mill, to make the purée for the next step.
3 Put the purée through a food mill or chinoise. Alternatively purée it thoroughly in a blender or food processor. Taste again and adjust sugar/lemon/spices if necessary. The purée should be very smooth.
4 Line a rimmed baking sheet with sturdy plastic wrap (the kind that is microwave safe). Pour out the purée into the lined baking sheet to about an 1/8 to 1/4 inch thickness.
5 Place the baking sheet in the oven, try to keep any plastic wrap from touch the sides of the oven or the oven racks. Also try to make sure that the plastic wrap hasn't folded back over on top of the purée. If this happens, the purée won't dry out. Heat the oven to a low 140°F. If you have a convection setting, use it, it will speed up the process and help dry out the purée. Let dry in the oven like this for as long as it takes for the purée to dry out and form fruit leather. We usually keep it in the oven overnight, so about 8-12 hours. The fruit leather is ready when it is no longer sticky, but has a smooth surface.
Alternatives to the oven. If you have a food dehydrator, this would be a great use of it. My mother suggested putting the tray in the weber grill, and leaving covered, in the sun all day. Sounds like a good trick, but I haven't tried it yet. My parents remember the traditional way of making fruit leather was just to tent the tray with some cheesecloth and leave it outside in the sun on a hot day.
6 When the fruit leather is ready, you can easily peel it up from the plastic wrap. To store it, roll it in its plastic wrap, put it in an airtight container and store in the refrigerator or freezer.
4 cups of fruit yield about one baking sheet of fruit leather.
Thanks again simplyrecipes! I used the one for the oven. My memory card is still full, so I'm glad I could share the pictures that they took. That's really how it looks when it's done. It was my first time making it. Instead of cooking it on the stove first and smashing everything up, I put everything into a blender and basically made a baby food/pure'e/applesauce base. I mixed it up adding some of our applesauce to make a little more. I cooked it on the stove, and put it on the cookie sheet. Then I put it on the lowest temperature overnight and when we woke up it was done. I couldn't believe how fast and easy it was! I think I'll make more when we have fruit we don't feel like eating again. It makes a great healthy snack.
Happy Snacking!
Love,
Tiffany
............................................................................
Hi guys! I'm back and now I have some pictures from the second time I have made this. (Ok, I've looked and can't find the pictures. Dang! I should have posted them when I first typed this. Let that be a lesson to me. Don't do too many things at once or you'll forget what you were doing in the first place. I'll have to get back to you on the pictures when I make it again.) I didn't put it in a blender this time. I actually followed the recipe step by step. I still recommend sticking it in a blender first though. Even though it makes more dishes to clean, it makes less work while cooking this fun recipe, and it's a whole lot faster. Do what you want though. Cooking is what you want it to be. I only had two apples this time. So, it didn't make as much as it did the first time. I also didn't add cinnamon to this recipe like I did the last one. Enjoy!
Space for rent. Pictures coming soon!
Wednesday, November 11, 2009
Recipe # 8 Hawaiian Haystacks

Rice

Cream of chicken soup mixed with a can of chicken.

Sprinkle some grated cheese on top.

Along with some pineapple.

And Wala! This is what you end up with.
(These were pictures from another time that we made Hawaiian Haystacks, but we didn't have all of the ingredients. So, we improvised with what we had. It was still good.)
Posted earlier:
I have a confession to make: I haven't had time to cook all week. My sweet husband has had to fill in for me because of me trying to play catch up with everything after being sick. Last night he came up with the brilliant idea of having Hawaiian Haystacks. They hit the spot just right! If you don't know what a Hawaiian Haystack is, I will explain and maybe you can try it out for dinner sometime.
Ingredients:
Rice
Cream of Chicken Soup
Canned Chicken (If you have some chicken left over from dinner the night before I guess you could use that.)
Pineapple
Shredded Cheese
Chow Mein Noodles
Tomatoes
Green Onions
I have also heard of people putting coconut on them
How to make them:
1. Cook the rice.
2. Pour the Cream of Chicken into a saucepan and add the Canned Chicken. Cook until hot. If you want this to spread out a little more, add a little bit of water.
3. Prepare the toppings. Slice the green onions and tomatoes. If you are using pineapple from a can open it. If you are making this for guests, you will want to put each of the ingredients into its own bowl or serving container. This is of course, if you want to have it buffet style, which I would highly suggest doing because people like different things on their Hawaiian Haystacks. (Presentation is everything.)
4. Put as much rice as you want on your plate.
5. Add desired toppings.
6. Eat and Enjoy.
I like the cream of chicken sauce on mine followed by shredded cheese, chow mein noodles, and I top it off with pineapple.
Brent likes everything on his that is on our ingredients list for toppings.
If you like something that is not on our ingredients for the toppings list on yours let us know. We love comments!
Happy Cooking!
Love,
Tiffany
"Part of the secret of success in life is to eat what you like and let the food fight it out inside."
~Mark Twain (Samuel Langhorne Clemens)
Thursday, November 5, 2009
Sunbathing Turkey

I was searching for funny Thanksgiving pictures to hang up on our windows, and I stumbled across this! I don't want to hang it on our window, because I don't want to offend people, but I thought it was pretty funny. :) I'm not sure who took this picture, or I would give them credit. I thought I'd share it for Thanksgiving this is for all of you Turkey lovers out there.
Happy cooking!
Love,
Tiffany
Wednesday, November 4, 2009
Recipie #7 Easy Pumpkin Pie
Easy Pumpkin Pie
1 (9 inch) unbaked pie crust
1 can (15 oz.) pumpkin
1 can sweeten condensed milk
2 eggs
1 tsp. cinnamon & vanilla extract
1/2 tsp. nutmeg, salt & ground ginger
Preheat oven to 425 degrees (Fahrenheit). In a large bowl, beat all ingredients together with a whisk or mixer. Pour into crust and bake for 15 minutes. Reduce heat to 350 degrees (Fahrenheit) and bake for 35-45 minutes longer. Cool before serving.
I got this recipe from our University Student Apartments News & Views November 2009, monthly newsletter. Just in time for Thanksgiving. Thanks!
I can't wait to try it out. Let me know how it went if you try it out. I love having comments!
Happy Baking!
Love,
Tiffany
"Vegetables are a must on a diet. I suggest carrot cake, zucchini bread, and pumpkin pie." ~Jim Davis
Tuesday, October 6, 2009
Recipe # 6 Bruschetta 'n Cheese-Stuffed Chicken Breasts
Bruschetta 'n Cheese-Stuffed Chicken Breasts
Prep Time: 15 min Total Time: 1 hr Makes: 8 servings
What You Need!
1 can (14-1/2 oz.) Italian-style diced tomatoes, undrained
1-1/4 cups KRAFT Shredded Low-Moisture Part-Skim Mozzarella Cheese, divided
1/4 cup chopped fresh basil
1 pkg. (6 oz.) STOVE TOP Stuffing Mix for Chicken
8 small boneless skinless chicken breast halves (2 lb.)
1/3 cup KRAFT Roasted Red Pepper Italian with Parmesan Dressing
Make It!
HEAT oven to 350ºF.
MIX tomatoes, 1/2 cup cheese and basil in medium bowl. Add stuffing mix; stir just until moistened.
PLACE 2 chicken breasts in large freezer-weight resealable plastic bag. Pound with meat mallet or side of heavy can until chicken is 1/4 inch thick. Remove from bag; place, top-sides down, on cutting board. Repeat with remaining chicken. Spread chicken with stuffing mixture. Starting at 1 narrow end, tightly roll up each breast. Place, seam-sides down, in 13x9-inch baking dish. Drizzle with dressing.
BAKE 40 min. or until chicken is done (165°F). Sprinkle with remaining cheese; bake 5 min. or until melted.
Kraft Kitchens Tips
Variation For a south-of-the-border-style chicken dish, use diced tomatoes with bell or jalapeno peppers, KRAFT Mexican Style Shredded Cheese instead of the mozzarella cheese and chopped cilantro instead of the basil. Serving SuggestionServe with CRYSTAL LIGHT Iced Tea and hot cooked broccoli sprinkled with KRAFT Grated Parmesan Cheese.How to Store Long-Stemmed Fresh HerbsPlace long-stemmed fresh herbs, such as parsley, cilantro and dill, in a tall glass with the stem ends down. Fill with an inch of cold water; make sure no leaves are under the water. Cover the leaves loosely with a plastic bag and refrigerate until ready to use, changing the water every 2 days. Herbs should stay vibrant and fresh for about 5 days.
Just thought I'd share this. I got it in an email from Kraft Foods. It looks delicious! I can't wait to try it out! :)
Bruschetta 'n Cheese-Stuffed Chicken Breasts recipe at Kraftfoods.com
Happy Cooking!
Love,
Tiffany
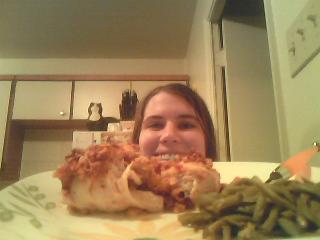
I promised a picture if I attempted to make it:

And yes, it was delicious!
I would highly recommend it.
"Cooking is being inspired to add a pinch of this and a dash of that to a recipe and it still tastes great." ~Tiffany Lindsey
I made this quote up because I did just that the other day. I added Apple Cider Vinegar in the place of eggs that the recipe called for. (I was in the middle of baking and didn't want to have to run to the store.) I was worried that it wouldn't turn out, but it tasted fabulous! No aftertaste or anything.
Prep Time: 15 min Total Time: 1 hr Makes: 8 servings
What You Need!
1 can (14-1/2 oz.) Italian-style diced tomatoes, undrained
1-1/4 cups KRAFT Shredded Low-Moisture Part-Skim Mozzarella Cheese, divided
1/4 cup chopped fresh basil
1 pkg. (6 oz.) STOVE TOP Stuffing Mix for Chicken
8 small boneless skinless chicken breast halves (2 lb.)
1/3 cup KRAFT Roasted Red Pepper Italian with Parmesan Dressing
Make It!
HEAT oven to 350ºF.
MIX tomatoes, 1/2 cup cheese and basil in medium bowl. Add stuffing mix; stir just until moistened.
PLACE 2 chicken breasts in large freezer-weight resealable plastic bag. Pound with meat mallet or side of heavy can until chicken is 1/4 inch thick. Remove from bag; place, top-sides down, on cutting board. Repeat with remaining chicken. Spread chicken with stuffing mixture. Starting at 1 narrow end, tightly roll up each breast. Place, seam-sides down, in 13x9-inch baking dish. Drizzle with dressing.
BAKE 40 min. or until chicken is done (165°F). Sprinkle with remaining cheese; bake 5 min. or until melted.
Kraft Kitchens Tips
Variation For a south-of-the-border-style chicken dish, use diced tomatoes with bell or jalapeno peppers, KRAFT Mexican Style Shredded Cheese instead of the mozzarella cheese and chopped cilantro instead of the basil. Serving SuggestionServe with CRYSTAL LIGHT Iced Tea and hot cooked broccoli sprinkled with KRAFT Grated Parmesan Cheese.How to Store Long-Stemmed Fresh HerbsPlace long-stemmed fresh herbs, such as parsley, cilantro and dill, in a tall glass with the stem ends down. Fill with an inch of cold water; make sure no leaves are under the water. Cover the leaves loosely with a plastic bag and refrigerate until ready to use, changing the water every 2 days. Herbs should stay vibrant and fresh for about 5 days.
Just thought I'd share this. I got it in an email from Kraft Foods. It looks delicious! I can't wait to try it out! :)
Bruschetta 'n Cheese-Stuffed Chicken Breasts recipe at Kraftfoods.com
Happy Cooking!
Love,
Tiffany
I promised a picture if I attempted to make it:
And yes, it was delicious!
I would highly recommend it.
"Cooking is being inspired to add a pinch of this and a dash of that to a recipe and it still tastes great." ~Tiffany Lindsey
I made this quote up because I did just that the other day. I added Apple Cider Vinegar in the place of eggs that the recipe called for. (I was in the middle of baking and didn't want to have to run to the store.) I was worried that it wouldn't turn out, but it tasted fabulous! No aftertaste or anything.
Sunday, September 27, 2009
Recipe # 5 Asian Beef Noodles
THE PAMPERED CHEF®
Asian Beef Noodles
I pound lean boneless beef top round steak, cut into 1/4-inch strips
3 garlic cloves, pressed
2 small pieces (1/2-inch) fresh ginger root, peeled and finely chopped
2 cups water
2 packages (3 ounces each) baked beef-flavor ramen noodles
3 cups broccoli florets
2 carrots, sliced
2 green onions, sliced
Assemble ingredients prior to recipe preparation.
Asian Beef Noodles
Nutrients per serving: Calories 220, Total Fat 3 g, Saturated Fat 1 g, Cholesterol 50 mg, Carbohydrate 24 g, Protein 23 g, Sodium 370 mg,-Fiber 3g
Cook's Tip: For added flavor, add 1-2 tablespoons Pantry Asian Seasoning Mix with the water, if desired.
© The Pampered Chef, Ltd., 2001 1YO02041-03/01
Recipe courtesy of The Pampered Chef. Thank you!
I got this recipe with one of my wedding presents. It was with the Pampered Chef Bamboo Spatula Set. We also have some cooking pans from the Pampered Chef. I love them! They have very good quality products. If you want to find anything to do with cooking really, Check out: http://www.pamperedchef.com/ they also have more delicious recipes!
Again, I haven't made this yet, but I will. I'll let you know how it turns out.
Thank you Pampered Chef! You always have great recipes!
Happy Cooking!
Love,
Tiffany
"When baking, follow directions. When cooking, go by your own taste." ~Laiko Bahrs
Asian Beef Noodles
I pound lean boneless beef top round steak, cut into 1/4-inch strips
3 garlic cloves, pressed
2 small pieces (1/2-inch) fresh ginger root, peeled and finely chopped
2 cups water
2 packages (3 ounces each) baked beef-flavor ramen noodles
3 cups broccoli florets
2 carrots, sliced
2 green onions, sliced
Assemble ingredients prior to recipe preparation.
Asian Beef Noodles
- Heat Stir-Fry Skillet over medium heat until hot. Lightly spray with nonstick cooking spray. Stir-fry beef, half at a time, 3-4 minutes stirring with Bamboo Spatula Set. Remove beef from skillet; set aside.
- Add garlic and ginger to skillet; stir-fry 30 seconds. Add water; bring to a boil. Add noodles, broken into pieces, broccoli, carrots and seasoning packets from ramen noodles.
- Bring to a boil; reduce heat. Simmer 3 minutes or until noodles are tender and most of the liquid is absorbed. Return beef to skillet; heat through. Sprinkle with green onions.
Nutrients per serving: Calories 220, Total Fat 3 g, Saturated Fat 1 g, Cholesterol 50 mg, Carbohydrate 24 g, Protein 23 g, Sodium 370 mg,-Fiber 3g
Cook's Tip: For added flavor, add 1-2 tablespoons Pantry Asian Seasoning Mix with the water, if desired.
© The Pampered Chef, Ltd., 2001 1YO02041-03/01
Recipe courtesy of The Pampered Chef. Thank you!
I got this recipe with one of my wedding presents. It was with the Pampered Chef Bamboo Spatula Set. We also have some cooking pans from the Pampered Chef. I love them! They have very good quality products. If you want to find anything to do with cooking really, Check out: http://www.pamperedchef.com/ they also have more delicious recipes!
Again, I haven't made this yet, but I will. I'll let you know how it turns out.
Thank you Pampered Chef! You always have great recipes!
Happy Cooking!
Love,
Tiffany
"When baking, follow directions. When cooking, go by your own taste." ~Laiko Bahrs
Tips For Frosting 2 – Layer Cakes
This is not a recipe! It may come in handy though.
Tips For Frosting 2-Layer Cakes
Love,
Tiffany
Tips For Frosting 2-Layer Cakes
- Cool cake layers completely.
- Brush off any loose crumbs.
- Place one layer, top side down, on plate.
- Spread about 1/3 cup frosting over top. ,
- Place second layer, top side up, on first layer.
- Spread a very thin layer of frosting
on sides of cake to seal crumbs.
- Spread remaining frosting on sides and top of cake.
- Immediately sprinkle candy bits over frosted cake or create a fun design.
Love,
Tiffany
Recipe # 4 Funfetti Pretzel Hearts
Funfetti Pretzel Hearts
4-oz. vanilla-flavored candy coating or almond bark
3/4 cup Pillsbury® Pink Vanilla Funfetti@ Frosting
2 cups miniature heart-shaped pretzel twists (about 50)
1. Line cookie sheet with waxed paper. Place candy coating in 1-quart microwave-safe bowl. Microwave on HIGH for 1 to 2 minutes or until melted, stirring occasionally. Stir in frosting. Microwave on HIGH for 30 seconds or until melted. Stir until smooth.
2. Dip each pretzel twist in candy coating mixture. (If coating is too thin, cool a few minutes; if coating is too thick, warm a few seconds in microwave.) Place on waxed paper-lined cookie sheet; immediately sprinkle with candy bits from frosting. Let pretzels stand 30 minutes or until coating is completely set. Store in covered container in cool, dry place.
Makes: 10 servings
According to the package, this is what it is supposed to look like when you are finished:

I got this recipe and the picture from my can of Pillsbury Pink Vanilla Funfetti Frosting. It doesn't have an individual who submitted the recipe listed. So, I will just have to assume that the recipe came from Pillsbury.
I haven't tried them yet, but they look delicious. What a fun treat to watch a movie together with the family. J I'm sure the kids will love them just as much as the adults.
Happy Cooking!
Love,
Tiffany
"Never Eat More Than You Can Lift." ~Miss Piggy
4-oz. vanilla-flavored candy coating or almond bark
3/4 cup Pillsbury® Pink Vanilla Funfetti@ Frosting
2 cups miniature heart-shaped pretzel twists (about 50)
1. Line cookie sheet with waxed paper. Place candy coating in 1-quart microwave-safe bowl. Microwave on HIGH for 1 to 2 minutes or until melted, stirring occasionally. Stir in frosting. Microwave on HIGH for 30 seconds or until melted. Stir until smooth.
2. Dip each pretzel twist in candy coating mixture. (If coating is too thin, cool a few minutes; if coating is too thick, warm a few seconds in microwave.) Place on waxed paper-lined cookie sheet; immediately sprinkle with candy bits from frosting. Let pretzels stand 30 minutes or until coating is completely set. Store in covered container in cool, dry place.
Makes: 10 servings
According to the package, this is what it is supposed to look like when you are finished:

I haven't tried them yet, but they look delicious. What a fun treat to watch a movie together with the family. J I'm sure the kids will love them just as much as the adults.
Happy Cooking!
Love,
Tiffany
"Never Eat More Than You Can Lift." ~Miss Piggy
Saturday, September 26, 2009
Recipe # 3 French Lentil Soup
3 Tbs. Extra Virgin Olive Oil
2 Cups Chopped Onions
1 Cup Chopped Celery Stalks
1 Cup Chopped Carrots
2 Garlic Cloves, Chopped
4 Cups (or More) Vegetable Broth
1 1/4 Cups Lentils, Rinsed, Drained
14 1/2 Ounces Diced Tomatoes In Juice
Balsamic Vinegar (Optional)
Heat oil in heavy large saucepan over Medium-High heat. Add onions, celery, carrots, and garlic. Saute' until vegetables begin to brown, about 15 minutes. Add 4 cups broth, lentils, and tomatoes with juice, bring to boil. Reduce heat to Medium-Low, cover, and simmer until lentils are tender, about 35 minutes. Transfer 2 Cups soup to blender and puree until smooth. Return puree to soup in pan; thin soup with more broth by ¼ cupfuls, if too thick. Season with salt, pepper, and a splash of vinegar, if desired.
I got this recipe from: Something To Chew On; and they got it from: epicurious.com
Thanks!
Check Out: www.foodco-op.net for more tasty recipes!
Happy Cooking!
Love,
Tiffany
"As the days grow short, some faces grow long. But not mine. Every autumn, when the wind turns cold and darkness comes early, I am suddenly happy. It's time to start making soup again." ~Leslie Newman
Recipe #2 Roasted Potato, Garlic, and Red Pepper Salad
6 Garlic Cloves, Unpeeled
3 Lbs. Small Boiling Potatoes
2 Red Peppers
3 1/2 Tbs Extra - Virgin Olive Oil
3 Tbs. Balsamic Vinegar
1/2 Cup Small Fresh Basil Leaves
Preheat oven to 450 degrees Fahrenheit. Wrap garlic cloves in foil. Halve potatoes and cut peppers into 1/2 - inch pieces. Toss potatoes, peppers, and 3 Tbs. oil with salt and pepper. Arrange potatoes and peppers in one layer in large shallow baking pans and roast in middle and lower third of oven. Simultaneously, roast the garlic on either rack. Stir the potatoes occasionally, until tender and golden brown, about 35 minutes. When done, immediately toss with 2 Tbs. vinegar and cool. Remove garlic from foil and squeeze pulp into a bowl, mash garlic with 1/2 Tbs. oil and 1 Tbs. vinegar and toss with potatoes. Add basil just before serving. Can add olives, pine nuts, goat cheese, grilled chicken, etc.
I got this recipe from: Something Tow Chew On; and they got it from: epicurious.com
Thanks!
Check out: www.foodco-op.net for more delicious treats!
Happy Cooking!
Love,
Tiffany
"You don't have to cook fancy or complicated masterpieces - just good food from fresh ingredients." ~Julia Child
Recipe #1 Arepas with Corn & Cheese
Arepas with Corn and Cheese
1 Cup Cornmeal
1/2 tsp Salt
1/2 Cup Grated Cheddar Cheese
1 Cup Milk
2 Tbs Butter
1/2 Cup Corn Kernels, Fresh or Frozen
1/4 Cup Chopped Scallion
1 Small Jaleeno, Seeded and Minced
3 Tbs Oil
Cooked Black Beans, Vegetables or Sour Cream For Stuffing, Optional
Put cornmeal in a large bowl with salt and cheese. Heat the milk over med-low heat until steaming, add butter to melt. Stir into cornmeal mixture until thick. Fold in corn, scallion, cilantro and chili. Let batter rest for 15 minutes then form 3-inch balls and flatten. Heat oil in a large skillet and cook until golden brown, about 5 minutes then flip and cook for another 3 minutes. When cool, slice through the middle and fill if desired.
I got this recipe from: Something To Chew On
Thanks!
Check out: www.foodco-op.net for more delicious treats!
I will try to post pictures of what the recipes look like once I have made them myself. That feature is in the works... My memory cards are both completely full with family pictures right now. I have to clear them out and/or get a new memory card. So, stay tuned for pictures! :)
Go try this or make something special of your own! Let me know how it goes!
Love,
Tiffany
"I was 32 when I started cooking; up until then, I just ate." ~Julia Child
Hello to all of you food lovers out there in internet land!

Hi! My name is Tiffany. Welcome! This is my first blog post here. So, I'll let you know why I created this blog and why you will want to stop by often. :)
First, I created this blog because I love food. I am also learning how to cook more food than I used to know how to cook. Thanks mom for all of your delicious meals! Now it's my turn to figure this stuff out. Ready or not! I also love to collect recipes and this was the perfect idea for storing recipes without having to dig through things to find them.
I know what good food looks, smells, and tastes like. Although, everything I make may not always turn out the way that I might want it to. If that does happen, I pick myself up and try, try again. I believe that cooking is an art. A skill that needs to be learned and the only way that it can be learned is through practicing.
I am game for trying new things. I love trying things from different cultures. I took an international foods class last summer. So, the most interesting thing that I have ever eaten to this day is a piece of dried squid. I guess they eat it like popcorn at the movie theaters in China. I don't know if I could do that! I think some kinds of tastes just have to grow on you.
If you have an interesting recipe, let me know! I would love to post it on here and tell the world about it. :) I also love comments. So, if you tried something and loved and or hated it, let us know what you thought. Also, if you have any ideas of how I can make this a better blog for everyone who reads it, let me know. Thanks!
Second, I will be posting any type of recipe that I can get my hands on. Like I said earlier, I love collecting recipes, but hate it when I can't find where I put them! I will be telling you where I found the recipes from and if there is a website that goes with it that I got it from, I will also try to post that as well.
I want to give credit to people for coming up with these fantastic creations. If I can't find who wrote/contributed the recipe I will say that it was someone anonymously. I will only take credit for any of the recipes that are made up by myself. So far that hasn't happened yet. Maybe as I get into cooking more I will come up with a masterpiece that you all just can't resist! Then I'll give myself credit for it like I have with everyone else. Thanks for reading and happy cooking!
Love,
Tiffany
"A jazz musician can improvise based on his knowledge of music. He understands how things go together. For a chef, once you have that basis, that’s when cuisine is truly exciting." ~Charlie Trotter
Subscribe to:
Posts (Atom)


Popular Posts
-
Gooey Butter Cake Ingredients for the first part of the recipe: 1 box yellow cake mix, without pudding 1 stick butter, melted 1 egg I...
-
 Funfetti Pretzel Hearts 4-oz. vanilla-flavored candy coating or almond bark 3/4 cup Pillsbury® Pink Vanilla Funfetti@ Frosting 2 cups ...
 -
Cooking Directions for Lasagna: Bring 5 quarts of water to a rapid boil. One tablespoon of oil may be added to water to prevent lasagna fro...
-
Ingredients: 1 banana Bananas are high in antioxidants, dopamine and serotonin. Dopamine boosts memory and attention while serotonin ele...
-
Butterscotch Bubble Loaf Rhodes’ famous Butterscotch Bubble Loaf is our most requested recipe every year. Watch how easy it is to make this...
-
I was searching for funny Thanksgiving pictures to hang up on our windows, and I stumbled across this! I don't want to hang it on our ...
-
Lemon Lime Slush Drink Ingredients: 4 cans frozen limeade 3 2 liters Sprite 1 can water Sugar to taste Ice Mix well in a blender an...
-
 Bruschetta 'n Cheese-Stuffed Chicken Breasts Prep Time: 15 min Total Time: 1 hr Makes: 8 servings What You Need! 1 can (14-1/2 oz.)...
 -
We don't drink alcoholic beverages, but we do like to celebrate with fancy drinks that are non-alcoholic. Here's one that I came up ...
-
 This is the second time that I have attempted this recipe. The first time the caramels went hard after about an hour. I think the heat was t...


